This is the brief that was given to me by my line manager. I have been asked to design a banner that can be used at events and workshops to help promote the business.
As a banner hasn't been designed before at TVMS I have decided to have a look at other promotional materials they have used. I decided to look at the TVMS brochure that promotes and explains the music packages.
The brochure that was created was aimed at schools, it includes the logo and photographs from class workshops.
When designing my banner I need to focus on what happens in the service. The banner should also show what TVMS wants to project which is showing that to them every child's music matters which is their slogan.
For this task I used Photoshop as I
personally find it the easiest to use. Before I started my project
I carried out some research by looking at different banner designs on-line. As
my Manager requested specific details he wanted on the banner, I had to take
the initiative and produce exactly what was wanted but also using my own ideas.
To start the project I selected File then New
to create the page. I had to change the Height and Width to the size of a
banner 800x2000/2200. It can be printed on different sizes but you need to take
into consideration that you don’t have any images that may be cut off by the
roll bleed. I decided to create 3 banners so that the company could change the
banner to suit the event. For one of the banners my Manager wanted me to leave
an A4 rectangle where they could place a photograph in the middle.
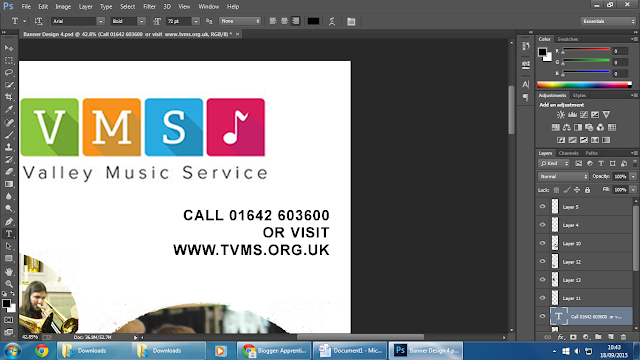
I added the logo to the banner; this is the key element as this helps to create a memorable impact with target audiences. The logo is used consistently used across all promotions and information as this helps customers connect the logo to the business.
The sponsors and partnerships at the bottom of the page started of being really large. So when I uploaded them I needed to change the size quite small so that they would all fit onto one row.
I then uploaded photographs from previous
events to Photoshop. When opening them on Photoshop it automatically opens them
in a new tab across the top. This is useful as it allows you to switch between
the different tabs. I resized the images then created a new layer for each
picture on the main page.
To add a new layer you go the tool bar at the top of the page select “Layer” then “New”. Next to the layers bar at the bottom right of the page there is an eye icon. This allows you to hide and show the image when needed.
For the purpose of this task I did not need to use many
tools to complete it. If I were there are many alternatives I could have used.
For example colour correction and filters could be used to help clean up or
retouch photos. Applying special art effects can give your image the appearance
of a sketch or painting. Filters can also be used create transformations using
distortions and lighting effects.
There are many filters you can select which is shown below:
I used the Horizontal Type Tool (T) to add text to the banner. This tool is found on the tool bar at the left side of the page. You can change the font and size of the text. My manager wanted me to include the company's new website and the phone number.
I chose to save the files in both PSD and JPEG so that I could open the document up and edit it if I needed to in the future. By saving it as a JPEG file it can be effective for pictures. JPEG can achieve impressive compression ratios, it can also discard kinds of information that the eye is least likely to notice. This format is the most popular as you can achieve high quality images. As there is photographs on my banner this is particularly why I chose to save it in this file type. I chose to save in JPEG because when saving a JPEG file on Photoshop, you can select the quality and size of the image. I saved my files as 10 to get the best maximum quality.
These were the 3 banners that I produced. 2 of the designs don't show the phone number or website so the process is shown, but they are included in the final outcome.

I sent an email to my manager with the attachments asking him if he would provide me with some feedback.
This was the banner that I chose as the final outcome. I chose this one as I thought that it was different and eye catching with the bubbles. I also felt like it would appeal to the target audience. One thing that I would change is the text on the banner. I would make it much larger than 72 which is the largest text Photoshop has. I would also change the font so that it was more quirky and attention grabbing.


No comments:
Post a Comment